part1、part2の続きです。
part3では「get_property」ノードでObject型のプロパティの値の取得と、ついでにschemaについて触れておこうかなと思います。
プロパティの値を取得する

図の通り、「create_mesh_cube」ノードでキューブを作成して、
赤丸の「face_offset」プロパティの「target」の値を試しに取得してみたいと思います。
    face_offset:
    {
        data: [ ... ] 7 elements (array<uint>)
        default: 4294967295 (uint)
        depends_on: [  ] 0 elements (array<string>)
        interp: 0 (int)
        target: face_component (string)
    }
dump_object的には上の7行目の値の事ですね。
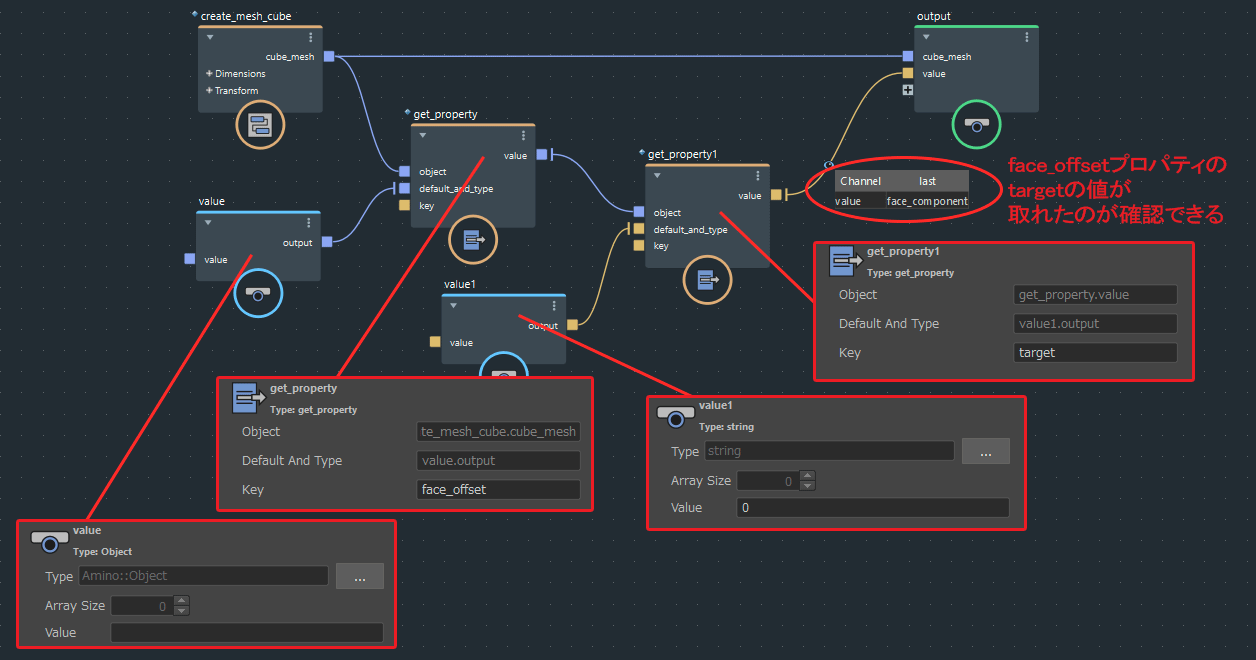
結果としてはこんな感じでget_propertyノードを組み合わせれば取得できます。
今回は最終的な値がstring型でdump_objectは使えないのでWatchpointで確認しています(赤丸の所が取得した値です)
一気に目的の値は取れなくて、段階的に値を辿っているのが分かるかなと思います。
まずはObject型のface_offsetを取得して、その次にその中にあるstring型のtargetを取っています。
get_propertyノードのdefault_and_typeは取得したい値の型をvalueノードで指定する感じなので、これも事前にWatchpointかdump_objectで事前に何の型なのかとか構成を確認してないと設定できない感じですね…
ちなみにpart1でget_geo_propertyノードとかset_geo_propertyノードとかでdataの値を取得、設定していましたが、中身を開くと分かりますが、get_propertyノードやset_propertyノードが使われているのが確認できるかと思います。
Schemaについて
ついでにschemaについて触れておこうかなと思います。
たぶん読み方はスキーマですかね?
part2で1からset_propertyノードでObject型を設定していきましたが、
既存のcreate_mesh_cubeノードとかは逐一set_propertyノードで指定する面倒くさいやり方をしているのかなー、というと、そうでもなく中身を探っていくと「construct_mesh」ノードというのが使われているのが分かります。
(名前はcreate_mesh1とリネームされていますが)
検索すると他にも同系統の「construct_points」ノードや「construct_strands」ノードというのもあるようです。
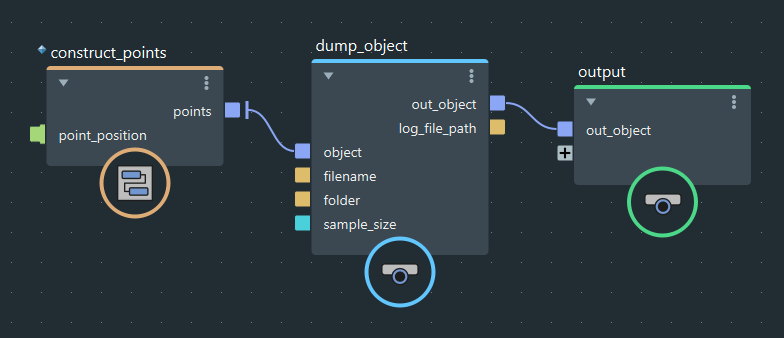
試しにconstruct_pointsノードをdump_objectで中身を見てみると…
{
    point_component:
    {
        count: 0 (uint)
    }

    point_position:
    {
        data: [  ] 0 elements (array<Math::float3>)
        default: {0f, 0f, 0f} (Math::float3)
        depends_on: [  ] 0 elements (array<string>)
        interp: 0 (int)
        target: point_component (string)
    }

}
↑こんな感じでdataの中身が空のテンプレートっぽい結果が出力されました。
これが大元のテンプレート用のノードなのかと言うと、まだ中身が開けるようなので、探ってみます。
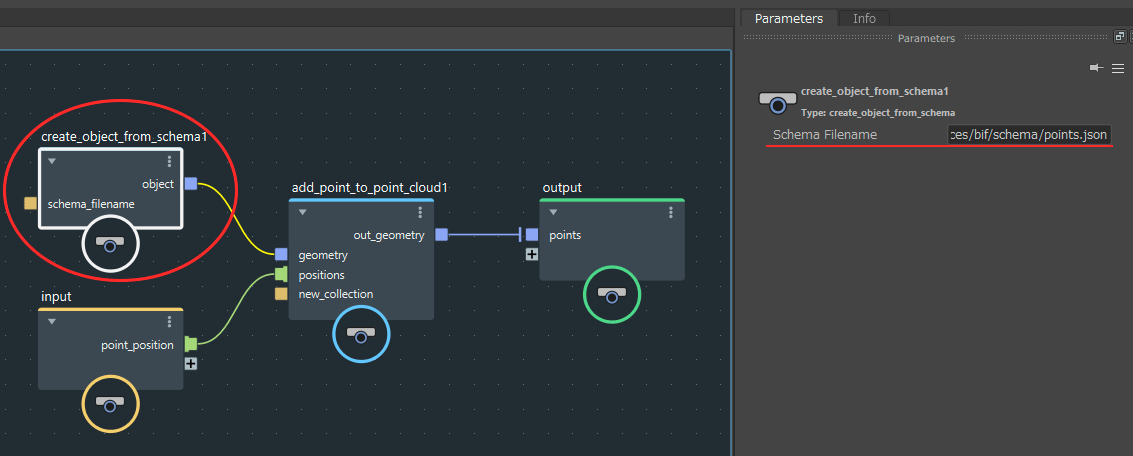
中身を開くと図のような感じで、add_point_to_point…と書いてあるノードはpoint_positionを設定するノードだと思われるので、赤丸の「create_object_from_schema」ノードが大元のテンプレートのノードっぽいです。
またパラメータをみると「Schema Filename」に「resources/bif/schema/points.json」というパスが設定されています。
ちなみに他のconstruct系ノードにも同じく「create_object_from_schema」ノードは存在して、
construct_meshノードには「resources/bif/schema/mesh.json」
construct_strandsノードには「resources/bif/schema/strand.json」
と設定されていました。
察するに、このjsonファイルがObjectのテンプレートを記載している物だと予想できます。
フルパスで書かれていませんが、大体こういう場合はインストールフォルダ以下を指していることが多いので探ってみるとありました。
「C:\Program Files\Autodesk\Bifrost\Maya2019\2.0.2.0\bifrost\resources\bif\schema」
↑インストール時にデフォルトから変更しておらず、Maya2019でBifrostのバージョンを2.0.2.0を使っている場合はこのようなパスになっていました(Windowsの場合)
import os
import subprocess

strEnvPath = os.environ["PATH"]
envPathList = strEnvPath.split(";")
for envPath in envPathList:
	if envPath.find("bifrost/bin") != -1:
		schemaFolderPath = envPath.replace("bifrost/bin", "bifrost/resources/bif/schema")
		print schemaFolderPath
		schemaFolderPath = schemaFolderPath.replace("/", "\\")
		subprocess.call('explorer "{0}"'.format(schemaFolderPath))
↑ちょっと雑ですが、こちらのPythonスクリプトをスクリプトエディタに張って実行すれば外套のフォルダが開けるはずです(たぶん)
「points.json」の中身を見てます。
{
    "type": "object",
    "description": "Point cloud schema",
    "properties": {
        "point_component": {
            "$ref": "ComponentGeoProperty.json#"
        },
        "point_position": {
            "$ref": "DataGeoProperty.json#",
            "typeOverrides": {
                "data": "array<Math::float3>",
                "default": "Math::float3"
            },
            "valueOverrides": {
                "target": "point_component"
            }
        },
        "point_velocity": {
            "$ref": "DataGeoProperty.json#",
            "typeOverrides" : {
                "data": "array<Math::float3>",
                "default": "Math::float3"
            },
            "valueOverrides": {
                "target" : "point_component"
            }
        },
------------------------- 省略 -------------------------
        "point_id": {
            "$ref": "DataGeoProperty.json#",
            "typeOverrides" : {
                "data": "array<long>",
                "default": "long"
            },
            "valueOverrides": {
                "target" : "point_component"
            }
        }
    },
    "required": [
        "point_component",
        "point_position"
    ]
}
中身はそのままだと長すぎるので、ガッツリ省略しました。
中身を見て分かるのはconstruct_pointsノードをdump_objectで中身を見た時より、かなり情報量が多いという事です。
「point_velocity」とか「point_force」「point_mass」とかいろいろなプロパティ名が記述されています。
construct_pointsノードをdump_objectで中身を見た時は「point_component」と「point_position」プロパティしかありませんでした。
ただ、よくよく見てみるとpoints.jsonの最後の方に
    "required": [
        "point_component",
        "point_position"
    ]
↑このような記載があります。
どうも「required」で指定したのみ使用する仕組みの様です。
試しに「required」の中身を書き換えたいと思いますが、インストールフォルダの直下にあるファイルを編集するのは、何となく危ない気がするので、いったん適当なフォルダへコピーして編集したいと思います。
コピーする際は、どうやら「ComponentGeoProperty.json」やら「DataGeoProperty.json」が「points.json」内で指定されているようなので、「schema」フォルダ事コピーするのが良いかなと思います。
    "required": [
        "point_component",
        "point_position",
        "point_velocity",
        "point_force"
    ]
↑コピーした「points.json」の「required」に「point_velocity」と「point_force」を足してみます。
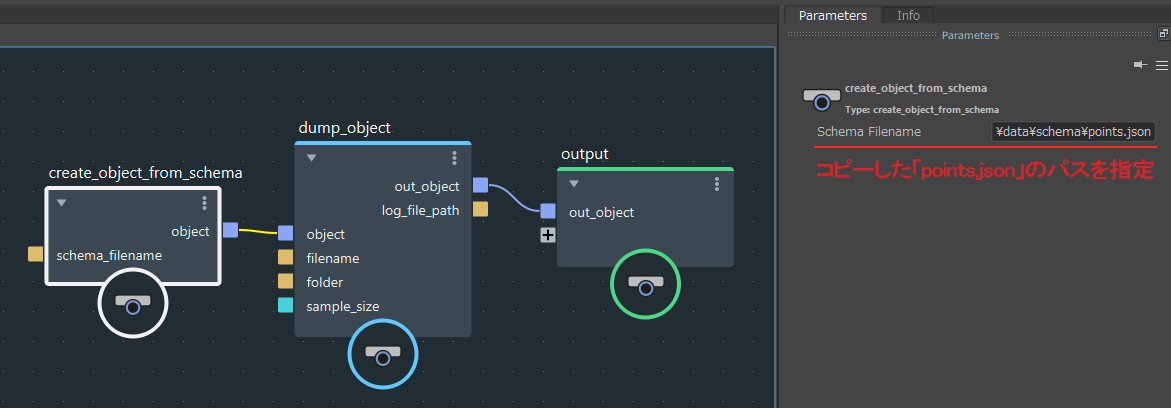
続いてcreate_object_from_schemaノードをdump_objectノードに接続して、
コピーした「points.json」ファイルのパスを指定します。
{
    point_component:
    {
        count: 0 (uint)
    }

    point_force:
    {
        data: [  ] 0 elements (array<Math::float3>)
        default: {0f, 0f, 0f} (Math::float3)
        depends_on: [  ] 0 elements (array<string>)
        interp: 0 (int)
        target: point_component (string)
    }

    point_position:
    {
        data: [  ] 0 elements (array<Math::float3>)
        default: {0f, 0f, 0f} (Math::float3)
        depends_on: [  ] 0 elements (array<string>)
        interp: 0 (int)
        target: point_component (string)
    }

    point_velocity:
    {
        data: [  ] 0 elements (array<Math::float3>)
        default: {0f, 0f, 0f} (Math::float3)
        depends_on: [  ] 0 elements (array<string>)
        interp: 0 (int)
        target: point_component (string)
    }

}
結果は↑この通り、「point_velocity」と「point_force」が追加されました。
こんな感じで、schemaのjsonファイルを使えばわざわざset_propertyノードで指定しなくても、
オリジナルのObjectのテンプレートが作れそうですね。
長くなりましたが、Object型の基本的な(?)扱い方については以上です。
まだ自分もBifrostを触り始めたばかりなので、他にも抑えておくべきポイントが見つかったら続き(part4)を書こうかなと思います。